Agile walls part 1 - planning walls
BVCs, TOWs and POWs are very important tools in the Agile world but what exactly are they? BVCs are Big Visible Charts, TOWs are Things on Walls and POWs are Plain Old Whiteboards. Why are they valuable tools?
Because everyone can see them, study them, understand them, and ideally update them. By making things Big and Visible we make them available to the entire team, not just select individuals. On the walls means that we publish them in public
where we can get full cross-team feedback. We want to keep our work as “waste-free” as possible so we need to keep it lightweight, easy to access, low tech so everyone can see and infinitely changeable, so the BVC as a TOW on a POW is an ideal tool that
everyone in the team should be able to use and update as required.
It seems so simple when we discuss it, keep things that the team needs in public and accessible areas. Save waste by doing enough to promote understanding and no more (no pretty Visio drawings). Keeping the information in public allows for good and open transparency around reviews, updates and important key metrics. Everything on full display to everyone all the time; it really fosters communication, collaboration and shared understanding through the whole team. By using flip charts, markers, cards, post
its and hand drawings we can convey a lot of information very quickly and effectively. We can also capture and record history, trends, past decisions, and progress or changes within the team.
What types of information? What types of walls? Who owns them? Who updates them? Well, there are many and varied approaches and information, so the answers to the previous questions is pretty much “it depends”, but here are a couple of really good ideas, some standard walls and some wonderfully inventive walls that I have seen, heard of and thought of, in no particular order; Planning Walls, Architecture Walls, Testing Walls and Reporting Walls. This post is about Planning Walls.
Planning Walls.
Planning walls are the walls that contain information about the plan for the work, for the team, for the product. These can be something like a release plan or a product road map or can be an iteration plan or even a story wall. Ideally, they are situated in a place where everyone in the team can see them and update them.
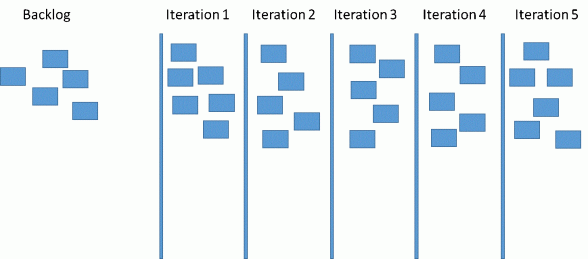
Figure 1 - Initial Release Plan
Release Plans – these walls contain the backlog of work and then the planned flow of work broken into iterations based on velocity or team structure. The backlog is the planned work to complete the project from the initiate phase of the project. The velocity is the team's estimated work capacity. The work units or stories are distributed into iterations, time-boxed work periods based on risk, dependencies, size and team capacity. This wall allows the holistic view of the entire piece of work, and
understanding of dependencies and work capacity of the team as well as a clear statement of project duration. These walls should be built by the team and updated by the team as the work progresses through each iteration and any
changes to the backlog or ongoing work is captured.

Figure 2-Living (updated) Release Plan
As an iteration is completed extra work such as Defects (red) or changes (green) can be captured and added to the plan. As each defect or changes is added the backlog is filled with existing work that can no longer be done in the planned time or additional work that has been identified. This allows the team to clearly see what work needs doing and when it will be done. If there are multiple teams working on the project the Release Plan can be divided horizontally into the teams and the work allocated to fit the teams resourcing, skills allocation and work capacity.
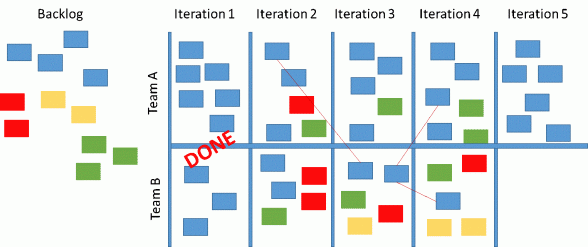
Figure 3-Multiteam Release Plan
From these release plans that are updated throughout the work of the project we can also see if the estimated velocity has been met, and if not, how many more iterations are required to complete the backlog. We can also track the amount of change that has been injected to the backlog by colouring or dating any new cards added. We can colour code cards to spot any specialist work areas. We can assess the quality of the work done by keeping the defects in a different colour and looking for how many of these are added to the wall. We can draw lines between the cards to track and manage dependencies. The items tracked on the walls can be stories, tasks, or even features or components of the product if mapping out the product lifecycle. If
this was not a project, but an ongoing stream of work, then the work and velocity could be measured in releases instead of iterations. If there is a calendar added over the top of the iterations then management can see delivery dates, workflow and can also assess things like resource constraints and plan for the management of other key team activities such as leave or training.
The release plan can be extrapolated up to portfolio planning and business unit work planning at the governance level or can be interpolated down to the team level where individuals contribution to the work is mapped on the daily level (an iteration plan) or at the workflow level (story walls).
The Release Plan should be updated at the end of each iteration by the whole team, feeding back and reflecting the value of learnings from the previous iteration, adding to the backlog, updating capacity and revaluating risk as they do so. The team managing the wall themselves has the added bonus of building an understanding of the entire project as well as growing ownership of what work will need to be done to deliver the entire product. Non-technical members of the team can see and understand the scope of work required to deliver the entire product and can also assess and understand the ramifications of changes to the plan, increased speed (which leads to increased defects) and the dependencies between stories.
Iteration plans are also on the Planning Walls, ideally near to the Release Plan. The iteration plan details the activities that need to happen to deliver the work planned for the iteration, but also captures key team events (like stand-ups, showcases and retros) and applies reality to the bigger picture release plans. An iteration plan should start with the mandatory processes for the team, all known team activities, identified, then the planned work for the iteration, as well as the iteration length in days and the work hours for the team.
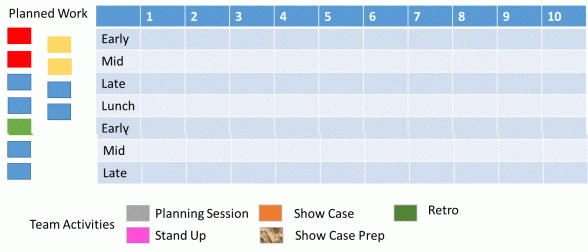
Figure 4-The beginning of the iteration plan
Then it’s like a big jigsaw puzzle trying to make all the planned work fit in with individual and team commitments such as core work hours, training, leave, other project work etc. The key is to populate the mandatory sessions first, then fill in the gaps with the planned work and common team activities such as elaboration or UAT and then finally allocate the individual work time. This allows everyone to know when they are needed for group activities (high dependency) and when they will have time to do their individual work on each piece of work.
At the completion of the iteration plan, all of the mandatory team activities should be in place and all the planned work for the iteration assigned to owners and planned for key delivery activities. Work that can be done concurrently is planned as well as key handover points for each of the planned work units. Ideally, the planned work will fit into the iteration, if not there will be some left overwork in the planned work area that will have to be fed back into the release plan at the end of the iteration. The
Iteration Plan is brilliant for doing stand-ups in front of, as it allows everyone in the team to indicate their current work and progress, but it also allows the entire team to understand, plan and manage the impact of slippage. If a plan is too optimistic
and does not allow for realities such as sick days, holidays, leave or training it becomes very obvious. If the planning has been done naively expecting 8 – 10 hours of at desk “work” from the team members it also becomes really obvious and the team can highlight issues and risk based on this quickly. It does however very much introduce ownership of estimates, as the team does the planning based on their own estimates. The team grows to realise how important their estimates are to other team members and also how a slippage in one story can impact on the delivery of another story.
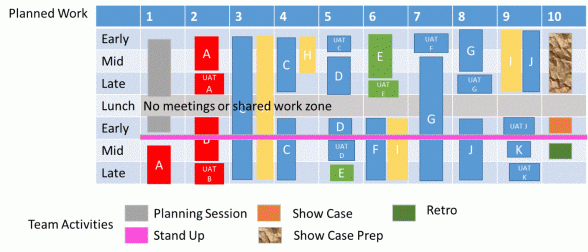
Figure 5-The completed Iteration Plan
The even more detailed level of planning wall is a story wall. This is where the lifecycle of a unit of work or a story is mapped out and the progress of the story through those activities is tracked. The story wall is a very common Agile wall, but it can be used incredibly effectively if a Kanban-style approach is used such as limiting work in progress and using avatars to indicate individual capacity as wells as the detailed activities that need to happen to achieve the completed work unit.
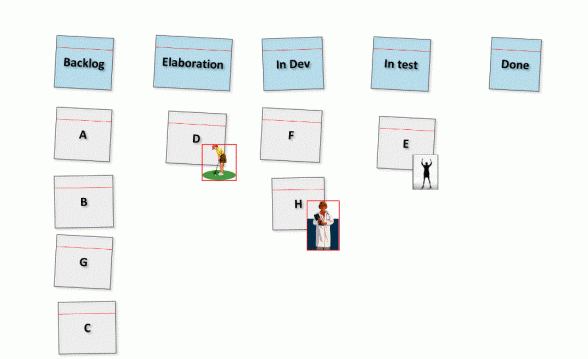
Figure 6-Standard Story Wall
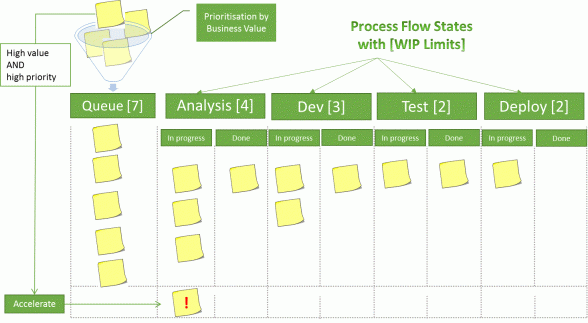
Figure 7- Kanban Workflow
Posted by Sharon Robson
Thank you!
Your details have been submitted and we will be in touch.
Thank you!
Your details have been submitted and we will be in touch.